There is a proper requirement of management and planning to transfer OST file to Office 365. In this blog post, you will get the best methods to import OST file into Office 365 by overcoming the challenges that make the process of migration difficult.
Why do you need to Convert OST to Office 365?
- When an organization plans to transfer data to Office 365
- Due to Exchange crashes
- To save the downtime of maintenance
- To get quick access to data
SysInspire OST to Office 365 Converter
- This Softwrae securely repair the damaged OST file and takes the capability to Import OST File into Office 365 without doing any changes in the data.
This software also offers a free trial for the comfort of the user.
Manual method 1- Convert OST to PST and Upload it to Office 365
Follow these below two steps to Import OST File into Office 365:
- Microsoft Convert OST to PST File
- Import PST file to Office 365
Step 1. Microsoft Convert OST to PST File
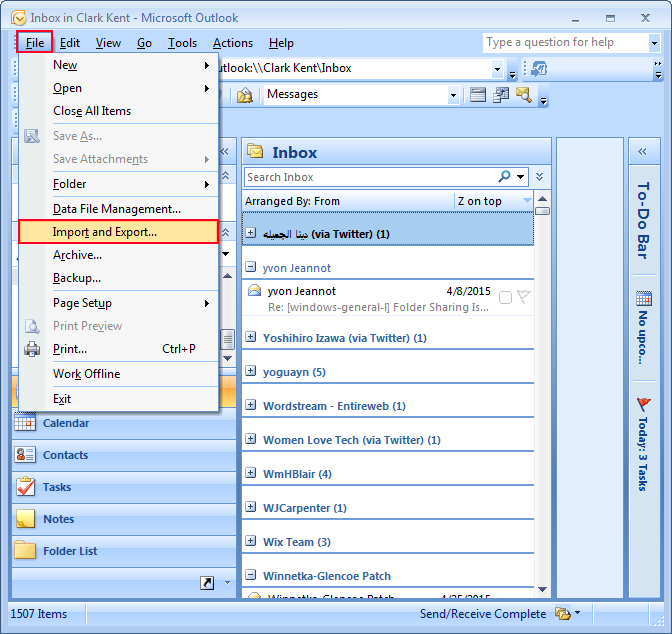
- Start Outlook application and visit file tab
- From the file menu, select Import, and Export option
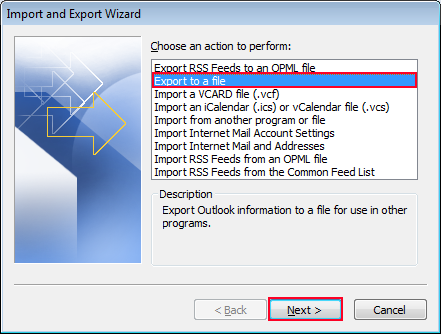
- Click on the Export to a file option and press the next tab to move further
- Select the emails or folders that you want to export and then click on next

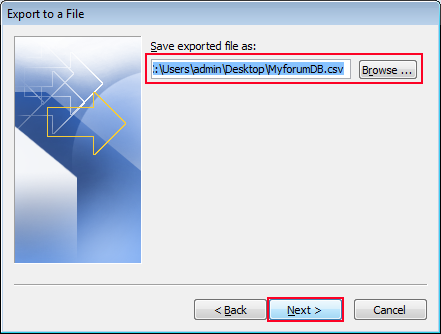
- Choose the location according to your comfort to save the PST file
- Choose the checkbox and replace the duplicate with items imported then tap on next
- Add a password for the PST file if needed
- In last Press the OK tab to export the PST file
Also you can get the best solution regarding these queries:
Step 2 – Import PST File to Office 365
- Enter into your Office 365 account and visit the Admin center of the Exchange server.
- Then you will see the Exchange server window. So visit permissions and click on organization management. There will be an option with + sign, click on it and choose mailbox Import Export. Click on add button tab and press OK
- Then again you need to Choose mailbox import-export and press the save tab
- Visit the admin center and choose set up after the selection of data migration. Press on the upload file
- Choose a new import job and gives a name to the job and press the next tab to move further
- Upload your data by clicking on the checkbox then press the next tab
- A window pop up will be seen-showing network upload SAS URL TAB just click on it
- Just Copy the URL and paste it on the notepad
- Install Azure AzCopy and Open it using this command AzCopy.exe /Source: \Network Path or File location /Dest:” SAS URL”/V: location path where you require to save log file /AzCopy.log /Y
- When a PST file is made, the next step is to create a CSV file
- Launch the import data window and see both alternatives and now press on the next tab
- Follow the given steps: Select the Mapping file — Upload CSV file — Validate — Save. So now your PST file gets uploaded in Office 365, now press the close tab.
Challenges with the manual method
- The user needs high connectivity and Exchange server and a similar Outlook profile for OST to PST conversion.
- It is a very lengthy process to Convert OST file to PST.
- You need professional knowledge to complete the conversion
Automated Method:- Using SysInspire OST to Office 365 converter
SysInspire has launched a secured third-party software that provides secure ways to transfer OST files to PST. This OST to Office 365 converter helps the non-skilled person to easily Import OST File into Office 365 without making any moderation in the database.
How to Import OST File into Office 365 using this Software?
- Firstly Install the application in your system, and open it
- Then add the OST file in the source section and add Office 365 mailbox in the destination section
- Select Office 365 mailbox sync them with OST files and now press filter option and migrate tab
- Create filters using different criteria like date filter, item filter, deleted filter, and then select OK, now select migration process
- When all OST files are transferred, the user will get a summary of the report.
Conclusion
So here we discussed both manual method and automated method but as you know the manual comes with many limitations. Also, the manual method does not maintain data integrity. To Import OST File into Office 365 securely you should go with SysInspire OST to office 365 Converter.
In the automated method, no information is lost and shared with a third party. Also, the software has a user-friendly interface which indicated that it can be easily operated by any beginner person.